Important: This article describes an old method of transcribing audio files to text. However, version 1.83 of Braina comes with a dedicated audio/video to text transcription feature and does not require a third party software or any complicated steps as mentioned in this tutorial. Please refer: Braina Transcription software
There are very few services that offer good audio or voice transcription and they are very costly. Sometimes these services require you to convert your voice files to a specific format (e.g. FLAC). Sometimes files fail to convert and often the accuracy of these services is poor. Braina Pro is a speech recognition software which allows you to convert live microphone input with the best accuracy in more than 40 languages of the world. But, can it transcribe pre-recorded digital audio files to text? Yes! Fortunately, you can convert any of your existing recorded voice by following an easy method:
- Download and install Braina Pro
If you haven’t downloaded Braina yet, you can download it from the following link for your Windows PC: https://www.brainasoft.com/braina/download.html
Braina Pro only costs $79 and you can transcribe unlimited files using it!
- Download and install virtual cable software
A virtual audio cable driver or software is needed to create a virtual connection between the speakers and the microphone. There are many third-party free and paid virtual cable software available but we prefer using VB-CABLE as it is free (donationware) and works perfectly. This software transfers your speaker output to your mic input.
Important Installation Steps: Extract all VB_CABLE files from the ZIP and run Setup Program in Administrator Mode. Restart computer after installation.
- Configure Sound Settings
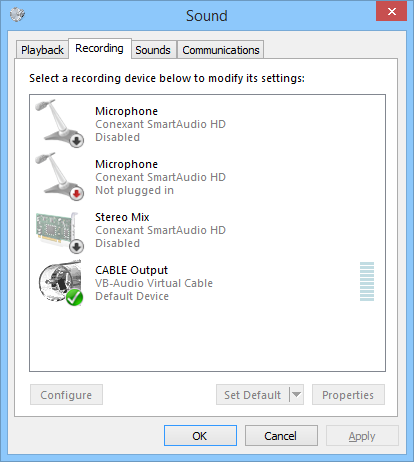
In Braina, type or say “Open Sound” (without quotes). This will open Sound settings. In the Playback tab of Sound Settings dialog, enable the “CABLE Input” and set it as default device and default communication device (Right click on “Cable input” to see options). Similarly, in the Recording devices tab, enable the “CABLE Output” and set it to default device and default communication device. Also make sure that all other Microphone options are disabled as shown in the images below.

- Transcribe
Now Braina will consider your speaker audio output as a mic input. Now to convert your audio file all you need to do is follow the steps below:
- Click on the microphone button (on the bottom right side of Braina’s window). This will open a new window. If it asks for permission, click on Allow button. If everything is fine, the grey microphone button will turn red.
- Type or say “Dictation mode on” (without quotes). Alternatively, you may also click on the D icon on the menubar. The icon will turn green indicating that the dictation mode is on.
- Place the mouse pointer in the third party software such as MS Word, Notepad etc. in which you want to convert your audio file to text and play your audio file using any media player. You won’t be able to hear the audio or speech but you will notice that Braina will start transcribing.
Note: After you have completed transcribing, you should change the sound settings back to normal otherwise you may not be able to hear voice from speaker. To do this, you can type/say “Open Sound” (without quotes) or go to the control panel and open Sound. In the playback tab and the recording tab, select your default speakers and mic (the one that had green tick before you changed to VB-CABLE), click on Set Default, Apply and Ok.
To hear to audio being played, open sound properties, go to Recording tab, select CABLE Output and click on Properties. In Properties window, go to Listen tab and tick on “Listen to this device”. Under playback through this device drop down menu select your speaker/headphone device through which you want to hear the audio. Click on Apply and then Ok. Now you will also be able to hear the audio during the transcription process.
You are all set to convert any audio file to text now! Let it be MP3, WAV, FLAC, WMA, AIFF, or OGG. Not only audio, but you will be also able to convert any video files like Mp4 to text. Languages supported by Braina for Speech Recognition are : Afrikaans, Bahasa Indonesia, Bahasa Melayu, Català, Čeština, Dansk, Deutsch (German), English, Española (Spanish), Euskara, Filipino, Français (French), Galego, Hrvatski, IsiZulu, Íslenska, Italiano (Italian), Lietuvių, Magyar, Nederlands, Norsk bokmål, Polski, Português (Portuguese), Română, Slovenščina, Slovenčina, Suomi, Svenska, Tiếng Việt, Türkçe, Ελληνικά, български, Pусский (Russian), Српски, Українська, 한국어, 中文 – 普通话 (中国大陆) (Chinese), 普通话 (香港), 中文 (台灣), 粵語 (香港), 日本語 (Japanese), हिन्दी (Hindi) and ภาษาไทย.
Moreover, what’s so awesome is Braina can convert voice of multiple speakers to text without needing any training. All other speech recognition software fail in doing this. So Braina can be useful for converting recorded speeches, radio broadcasts, meetings, interviews, ceremonies, videos etc.
Note: If the quality of the audio file is poor with too much background noise or if the speech is too fast then Braina may not be able to convert your audio file to text.
If you want to save time by utilizing our manual transcription services then please contact us. We will get back to you soon.
Can Braina “listen” to an interview recording from my iphone and turn it into text?
Can I transcribe on my PC from an audio on my iPhone?
Yes you can.
$39 fee is an annual fee or a one-time fee?
Annual.
In this software, the speech can be customized as healthcare or medical for medical transcription work?
Yes, it speech can be customized.
Does it convert wav files?
Yes
Can Brainasoft transcribe from voice memos from an I phone?
Yes, it can.
Is it possible dictate text in croatian language?
If I have mp3 documents, would it transfer it in text?
1. Can I use my Philips Voice Recorder with Braina?
2. Do I need to install virtual cable software if I use the above?
3. Do you offer online tech support as part of the subscription fee?
Thanks.
1. Yes
2. Yes
3. Yes
What about for a Mac?
Can it convert from live micro into for Vietnamese language?
Yes it can convert live microphone speech.
I am going to take some online courses. with this software can i run through the course convert the instructors voice and print it all out so I can follow along it I miss what he is saying?
Thank you
Does this Brainasoft work offline as well? I mean no cloud processing and storage involve at all?
Does it include time stamps when transcribing text? What to transcribe some Japanese